Registered on December 9, 2014 | 38 posts | 31 comments
Hi. I’m the admin of them.es and try my best to help whenever I can. If you would like to contribute to our products, feel free to visit the following GitHub profile: https://github.com/them-es
Are you managing an online community around a 🏢 business, ⚽ hobby or 🎀 cause where users can discuss topics with others – like we did here on this site you’re browsing right now? Are you in technical evaluation phase or unhappy with your current implementation? And is WordPress your go-to tool?
them.es Support is a Block Theme powered by WordPress 6.5+ making use of the new Interactivity API, so all the standard features from WordPress, like enhanced query pagination, posts, comments, user profiles, categories, tags are available out of the box
Convenient Community and effective User management features
Users can Mark topics as (un)resolved
Users can Like posts/comments
Users can Report posts/comments for admin review
Users can Search with an autocomplete feature
@user mentions
Unresolved topics widget
Markdown syntax
Users can upload an Avatar
Users can request a data export from the profile
Frontend editing experience powered by the new Interactivity API
The design with two built-in styles (Light/Dark) can be fully customized in the Site Editor
Alternatively it can be extended with a Child Theme, like we did here by integrating a unique design and adding several internal add-ons like a file uploader or widgets connecting to external services or APIs
All customers purchasing a license will get continuous Support with future updates
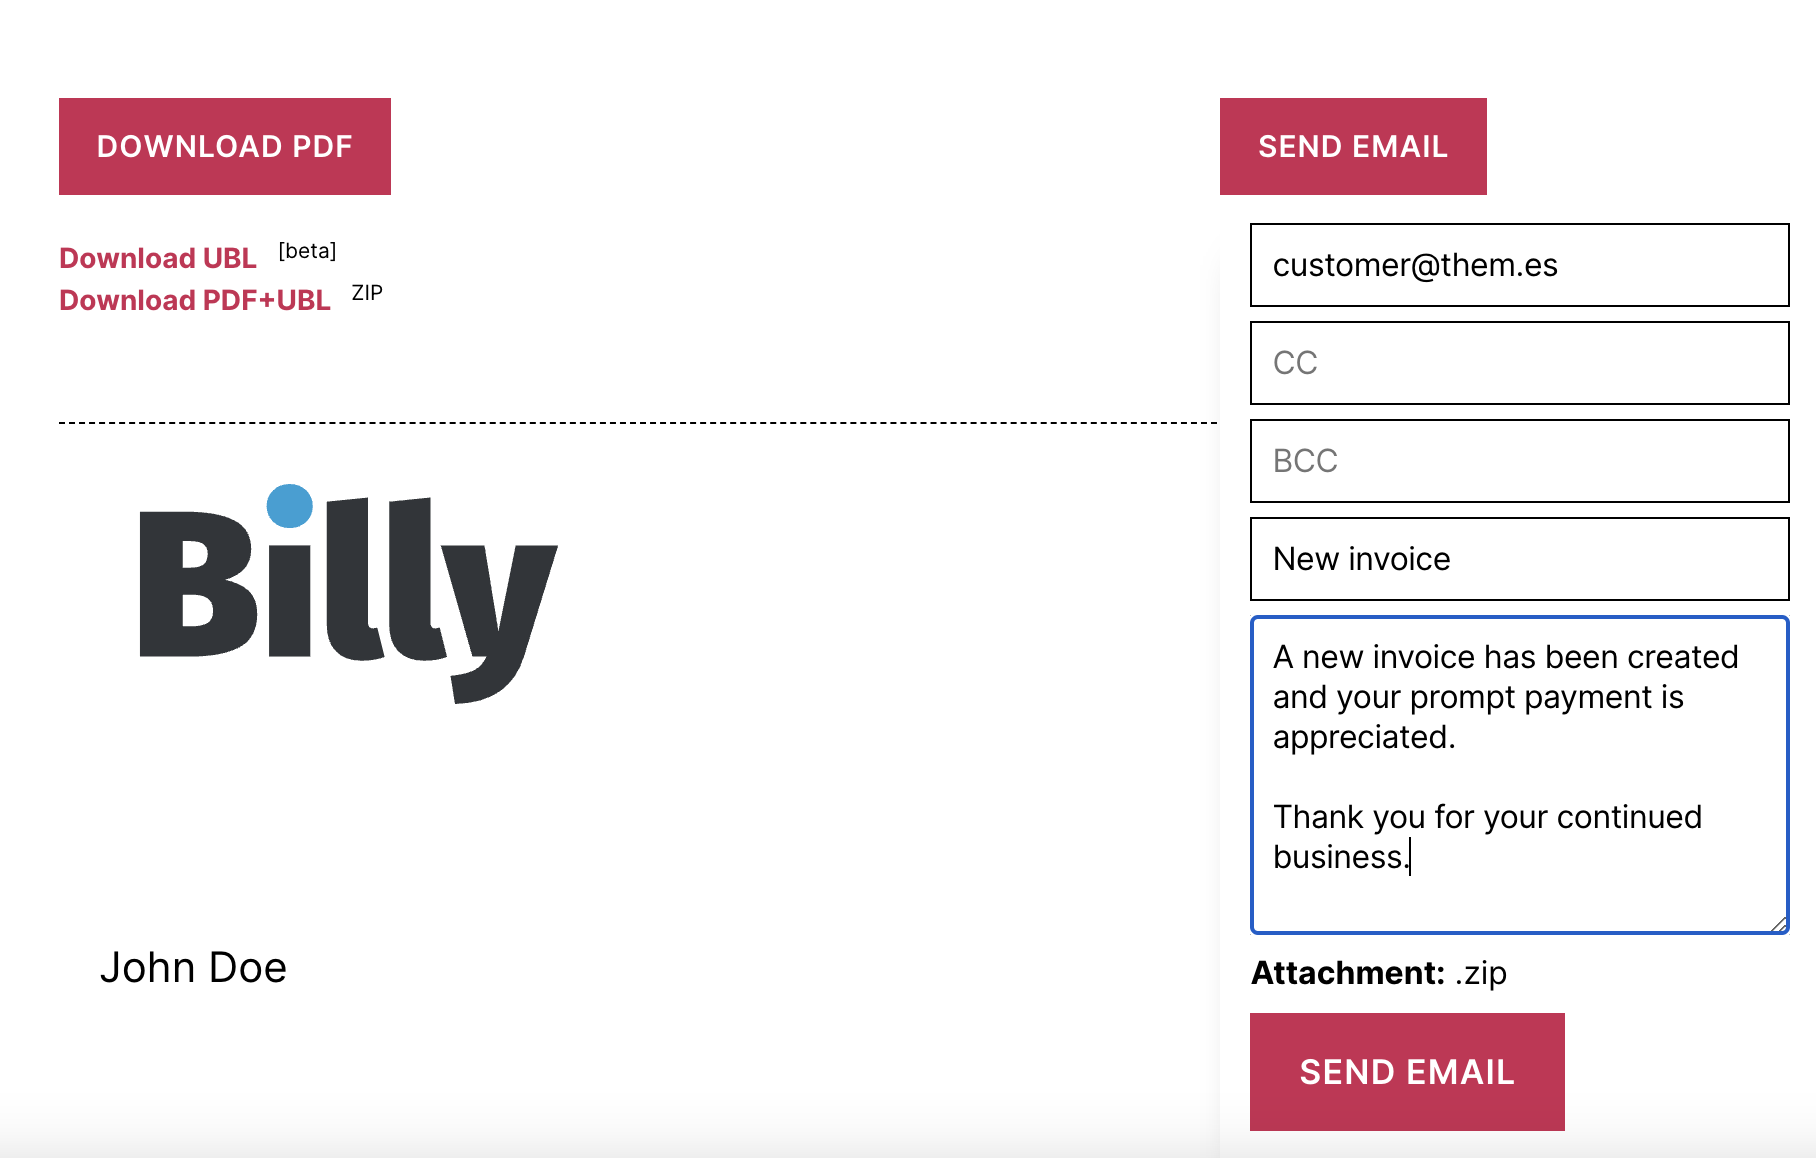
Finally a highly requested feature – the ability to send invoices and quotes as email attachments via a webform – has been implemented in the Pro version. Default values like email subject and email body can be defined globally. But it’s also possible to add a personal touch to the email and change the values individually per post.
Webform to send invoice as email attachment
As a consequence this makes sharelinks more or less obsolete and we decided to deprecate this feature without hard feelings. Password protected sharelinks lacked some important abilities (like downloading PDFs) and according to our knowledge and feedback from the community they were not used very often. In the end the email webforms are more convenient and even more secure because no passwords need to be sent to customers in cleartext anymore.
Existing links will continue to work for the time being but it will not be possible to create new sharelinks anymore.
Incorporating e-invoices is another important milestone in this release. Although PDF invoices are just fine if both contracting parties agreed on accepting them, the future belongs to transmitting documents in an electronic data interchange format. Heads up: E-invoices may even be required by law in your country sooner or later in a B2B or B2G context…
That’s why Billy invoices can now also be generated in the UBL XML format which is an open standard for electronic business documents. This feature is optional, needs to be explicitly enabled in the Customizer and has been marked as “beta”. Your help in testing the implementation is more than welcome.
Please be informed that an upgrade to at least WordPress v6.5 is mandatory if you want to use all new features as we developed with state-of-the-art technology like the Interactivity API to give you the look and feel you deserve. Falling back to an old approach was a no go. So if you’re still on an old WordPress version you can update the plugin but won’t be able to benefit from some of the cool new stuff.
Meanwhile WordPress is already in the 6.6 prerelease phase and since we thoroughly tested Billy with the current beta version, no compatibility issues are expected when WordPress 6.6 gets released in less than a month.
Billy – our Billing suite for WordPress – has received some useful updates in the latest release and even comes with new premium features in the Pro version.
Quote numbers can now be auto-incremented, similar to invoices. This is optional and the old default “Ymd” number format is still available. An useful addition to invoice and quote number prefixes are the placeholder variables {YEAR}, {MONTH} and {DAY} which means that you are now able to define number formats like INV-2024-05-13-12345678910 or similar.
A highly requested feature was having a fully customizable PDF footer layout. That’s why a reusable block pattern, similar to the PDF header, has been added in the block editor.
In addition, the PDF table output has been improved and inner borders are now enabled by default. Note that in the Pro version the PDF styles (of the table design and even more) can still be modified using custom CSS.
Speaking about the Billy Pro add-on. This release has received a major upgrade with two completely new enhancements and is available for all existing customers, having a lifetime license, with no additional costs. And best of all, the price for new users has not been raised.
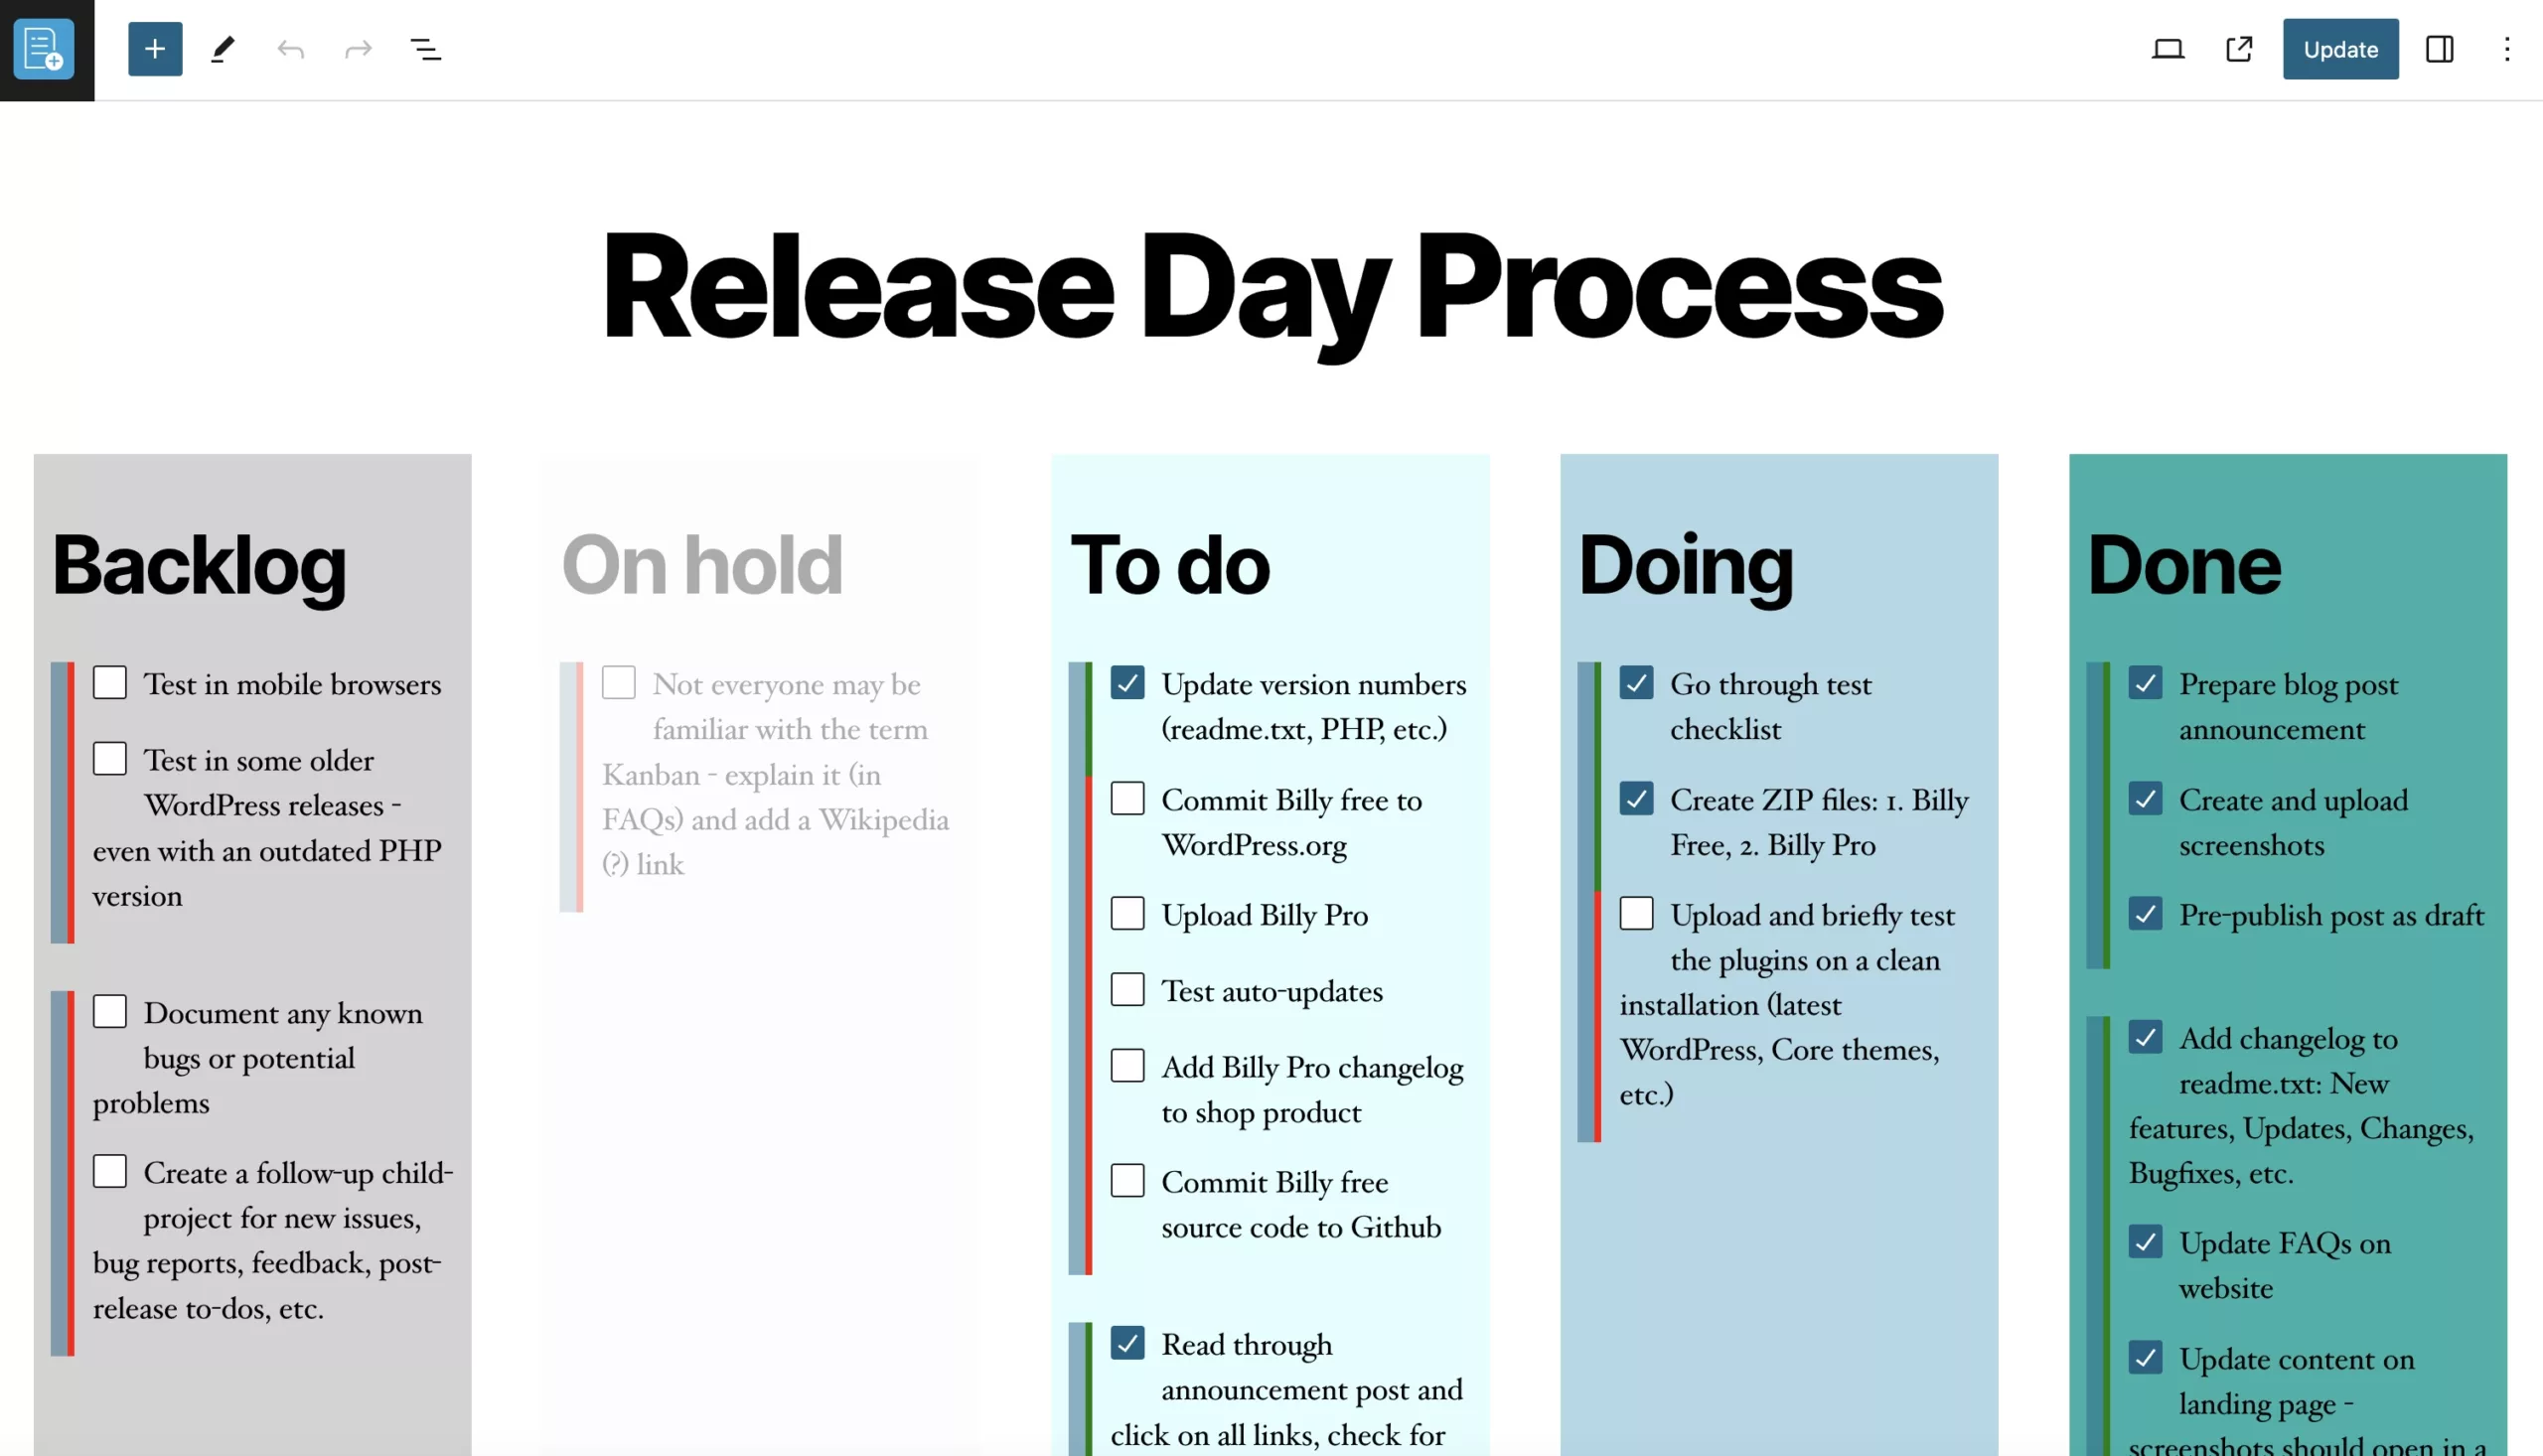
After you update the plugin you’ll get cool project management features like checklists in Kanban-style boards and a simple time tracking tool.
1. To do checklists (Kanban-style board)
2. Time tracking
By ensuring a smooth workflow and using a modular approach with full WordPress block editor compatibility, the editing experience should be an easy ride.
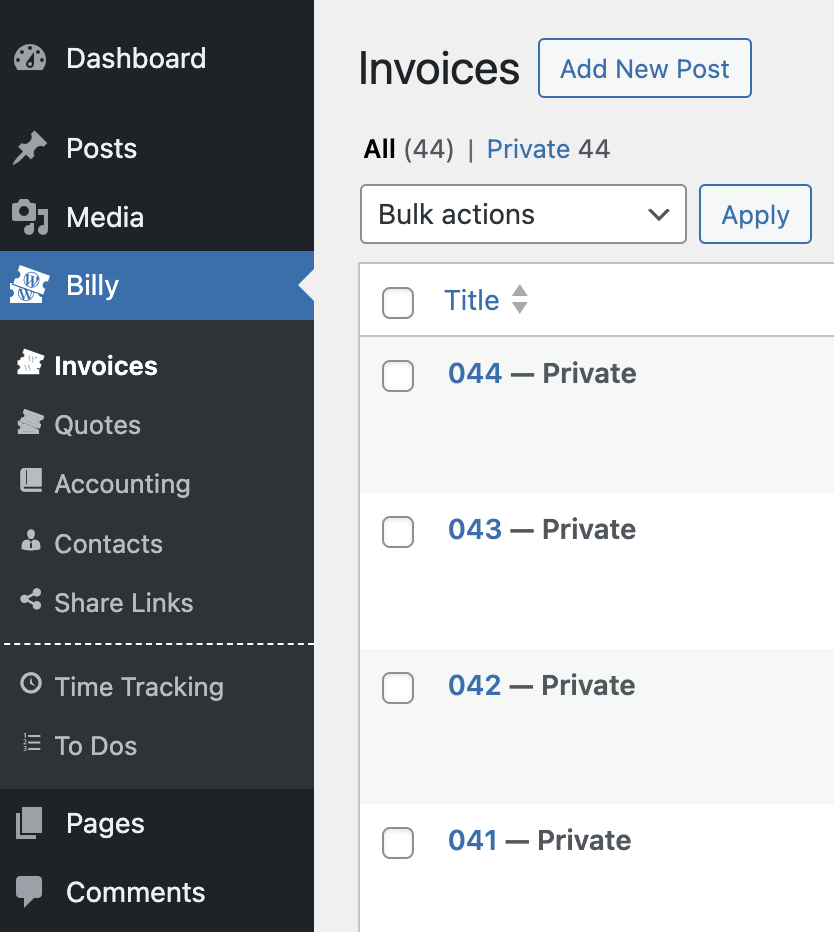
With the addition of two new Billy admin pages, the time had come to restructure and combine all pages in a single dashboard menu in order to keep the WordPress admin sidebar tidy.
New single dashboard menu with sub pages
An important advice as this can’t be said often enough: Your WordPress data will never leave your server and guarding against data corruption, breach or loss should be a matter of course. That’s even more important after Billy’s evolvement to a full project management suite.
When was the last time you reviewed and improved this process?
Many thanks 👋 to the engaged community for the valuable feedback that initiated the work on some of these features und bug fixes. There are still some requests and ideas in the pipeline, so stay tuned for more!
The new year starts great! A major milestone has been reached – our Bootstrap Starter Theme for WordPress was downloaded for the 25,000th time 🤩. Actually the number of websites out in the wild, using this theme as the foundation, may be even higher because we can’t measure 1:1 duplications and direct downloads from GitHub.
It’s very pleasant to see how one of our first OpenSource products evolved over time, with important quality improvements from contributors, valuable feedback from users and last but not least by looking at the numerous likes from stargazers. All the kudos we received prove that democracy, exchange and teamwork are still relevant today in a world (wide web) that’s transforming continuously.
THANK YOU to all friends, collaborators and developers (of underlying dependencies*) who made this possible!
* WordPress, Bootstrap, SASS, LESS, Webpack, Gulp, Grunt, NPM, etc.
WordPress is the leading web publishing platform standing for stability, reliability and sustainability, and celebrated its 20th anniversary last year. Bootstrap is the most popular HTML, CSS, and JavaScript frameworks for developing responsive, mobile first projects on the web.
them.es Bootstrap Starter Theme for WordPress combines the best of both worlds. Stay tuned for more because all in all it feels like the journey has only just begun…
Our WordPress invoicing plugin Billy and its companion Billy Pro have been refactored and finally make use of the Block API v2, resulting in a lighter DOM tree and an overall improved editor load time. Full backwards compatibility has been considered but if you’re using Billy Pro, it’s strongly advised to keep both plugins in sync and update each to the latest version.
In addition, the Pro add-on received new features for contacts. The contact selector in the post template has been rebuilt with an improved combobox selector and should help you finding the right contact quicker and easier. Furthermore it’s possible to upload a photo or logo to contacts for better identification.
In the edit post screen, invoices and quotes with status “overdue” and “pending” now show an eye-catching icon, indicating that the due date has been passed.
All in all we’re confident that this new release makes Billy (Pro) one of the best invoicing products currently available on the market – in particular for freelancers and small companies that are looking for a simple and uncomplicated solution with zero dependencies.
Did you know that the integration of this plugin in an existing WordPress website is a no-brainer and that you have total privacy control over your invoicing as no data every leaves the server or is shared with third-parties?
This tutorial helps you set up a basic localhost DEV environment on MacOS using Homebrew, to run WordPress (or any other PHP powered web-app) locally.
Installing Local, MAMP or other local server environments for testing and development may be an overhead if you just need a plain-vanilla web server that can be kept up-to-date easily.
⚠️ Before proceeding, please make sure that you’re using the latest MacOS version. Windows users should install a preconfigured DEV environment like XAMPP, MAMP for Windows or WampServer – if you feel comfortable you can try to setup Homebrew via Windows Subsystem for Linux (WSL). Linux users need to follow the official Homebrew on Linux guide and will have to change some file paths accordingly.
MacOS
Prerequisites
Visual Studio Code Visual Studio Code has become the de-facto standard in web development but any pre-installed editor will be sufficient.
Terminal MacOS app to perform shell commands. Any code snippet below starting with $ needs to be executed via a Terminal Emulator.
Homebrew Package manager for MacOS/Linux that helps you install the latest software packages for your localhost environment and automatically launches required processes when you start your system. Outdated packages can be updated with a single command.
WordPress Content Management System powered by PHP.
PHP is a popular general-purpose scripting language that is especially suited to web development. Fast, flexible and pragmatic, PHP powers everything from your blog to the most popular websites in the world.
MariaDB Community Server sets the standard for open source relational databases, with Oracle Database compatibility (e.g., sequences and PL/SQL), temporal tables, transparent sharding, instant schema changes, point-in-time rollback and modern SQL (i.e., common table expressions, window functions, JSON functions and more).
⚠️ “Localhost” is just a suggestion and you can choose whatever folder name you prefer.
Configure the database
Change the root password and create a new empty database for WordPress.
$ sudo mysql
$ ALTER USER 'root'@'localhost' IDENTIFIED BY '{NEW_PASSWORD}';
⚠️ The password is required to access the database and you’ll need it later – store the access credentials (Username “root” + chosen password) in your password manager or write it down somewhere.
$ CREATE DATABASE wordpress;
⚠️ You are free to choose a different database name.
Configure the web server
‼️ Find the default Apache configuration file in /opt/homebrew/etc/httpd/httpd.conf (on Mac computers with Apple silicon) or in /usr/local/etc/httpd/httpd.conf (on Mac computers with Intel processors), create a backup (e.g. httpd_backup.conf) and open httpd.conf in a text editor.
Uncomment or adapt the following lines and save the changes afterwards:
Download and extract the latest WordPress Core ZIP in an arbitrary Localhost directory (e.g. /{YOUR_USERNAME}/Localhost/wordpress), access http://localhost/wordpress/wp-admin/install.php and follow the setup guide by entering the database credentials defined earlier.
Some recommended tools that may make your WordPress developer life easier are Multisite Network (Maintain multiple sites on a single WordPress installation), Composer (PHP package manager), WP-CLI (Command-line interface for WordPress), phpMyAdmin or Adminer (Database management tools) and PHP Code Sniffer (PHP code quality and coding standards) in combination with the WordPress Coding Standard rules.
It’s strongly advised to always update to the latest software versions available.
$ brew update && brew cleanup
$ brew upgrade
Yes, you can use this local server to run other applications besides WordPress!
Feel free to install and setup any web tool that’s powered by PHP (and MySQL/MariaDB) on your new localhost environment. In addition to WordPress, covered in this post, some other popular applications you can use, include:
Drupal (Content Management System)
TYPO3 (Content Management System)
Joomla (Content Management System)
Nextcloud (Private Cloud server)
Magento (E-Commerce)
Matomo (Web analytics)
MediaWiki (Wiki software)
… just to name a few
That’s all for now
The instructions may be updated from time to time to reflect any OS specific changes. If you have questions, recommendations or just would like to say ❤️ Thank you, post a comment below.
We’re happy to announce that our Support Forum has been relaunched with a custom-built Theme based on our FSE Starter Block Theme (OpenSource, GPL2+).
Why the change?
When them.es/Support went live in 2015, we decided to set it up with the (now deprecated) P2 “Breathe” Theme and its companion, the o2 Plugin.
All in all it worked very well for years and we even managed to extend it according to our needs by using a Child theme. But recently the efforts to ensure compatibility with the latest WordPress and PHP versions have become quite a burden. Monkey patches 🙈 had to be applied to work around issues — and this is bad practice for obvious reasons.
Also, relying on code that is not maintained anymore was a no-go.
While evaluating existing Forum plugins and similar solutions it soon turned out that they all lack important features and could not be customized in a way that was satisfying. Putting the code base again in a dependence on third-party software with an unclear future was another no-go.
So we decided to go all-in and to develop our own tailored Support Theme. Thanks to the Gutenberg plugin and its new Interactivity API which currently is in active development, all requirements could be fulfilled without compromise.
What changed?
From a user-perspective not much changed at all, as all previous features like Search autocomplete, Frontend posting, File uploading and Marking requests as resolved, have been incorporated.
Besides the new foundation which reduced the code footprint to an absolute minimum, we polished the design a bit and added a better UX with interactive elements.
Furthermore users now can format their posts with basic Markdown syntax, if needed.
As a nice side effect the overall page loading performance has improved a lot.
Of course a re-release that makes use of a newish approach with bleeding-edge features may contain bugs and we kindly ask everyone to consider this site “Beta” for the time being. It’s quite possible that things get out of order or even break.
If you notice some hiccups or errors, please let us know, by commenting below, so that we can fix it. And if you miss something essential, we always keep the door open for feature-requests. Please mention why you are requesting it and what problem it may solve.
Hopefully you like the new Support Forum as much as we do.
We’ve received feedback from our community that the now retired build workflow (using Gulp and/or webpack to generate the CSS/JS assets) included several package vulnerabilities that have not been fixed for quite a while and obviously have become unmaintained by the creators.
One could argue that this should not be problematic, as these dependencies only affect the local development system – and as long as the build process still works, there’s no need to change a running system.
But using obsolete and unsupported software can be dangerous and can break things “overnight”. Not to mention potential security risks that may arise in the web development stack.
So it was necessary to find a new simple, modern and future-proof build process for SASS-CSS compilation and JS-bundling…
Fortunately the research did not take too long. The @wordpress/scripts package from the awesome Gutenberg community already comes with a proven and tested webpack configuration specific to WordPress development, which made it a perfect candidate to try out.
After some trial-and-error, the new build workflow worked pretty well and that’s why we decided to roll it out to all our Starter Themes (Full Site Editing, Bootstrap and Material Design) and include this new setup exclusively, meaning that Gulp (including its internal dependencies) is not needed anymore.
Start the development process: $ npm run watch Build and minify the assets: $ npm run build
👆 Breaking change: Theme build directories have been moved from /assets/css and /assets/js to /build which aligns with the @wordpress configuration. If you want to include the new workflow in an existing theme, please have a look at the source code in the Github repositories of the Starter Theme and adjust the paths of the JS/CSS assets in functions.php accordingly. On the other hand, if you want to keep the old workflow, feel free to keep it as long as it works on your side.
Today our favorite CMS celebrates its 20th anniversary 🎉. A special website dedicated to this event has been established by the WordPress team:
What started as a way to make a better blogging experience has grown into a vibrant open source project that powers an ever-growing percentage of the world’s websites.